Decision guideUpdated October 14, 20263 exact Amazon listings
Pin vs pinless moisture meter: which should I buy?
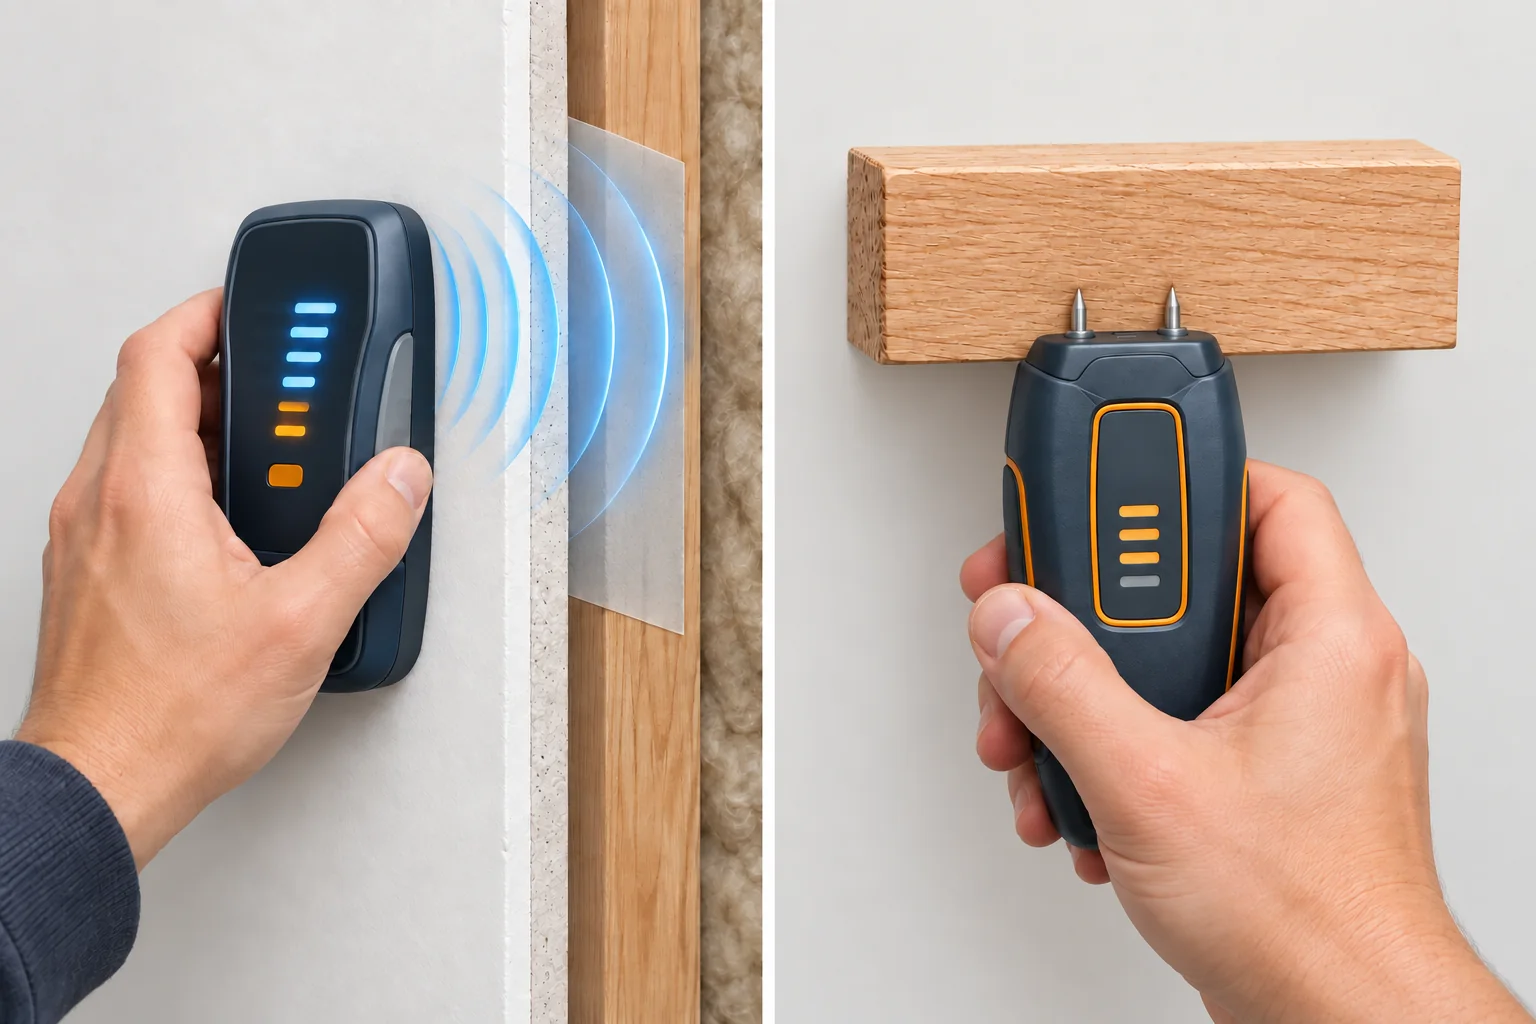
Start pinless when a finished wall must stay unmarked; use pins when you can reach supported wood or building material and small holes are acceptable. Compare every suspect spot with a dry area built the same way. One high reading does not prove a leak or mold—and neither choice identifies the cause of a damp patch.
Pin tips enter wood or compatible building material slightly; pinless meters scan without puncturing the surface.
Amazon options
What should you buy?
Buying through our Amazon links costs you nothing extra and helps us keep DadSetup free to read. As an Amazon Associate we earn from qualifying purchases.
Choose the model that fits the surface and access you have. Before ordering, confirm the model, selected mode, manufacturer depth guidance (including pin depth), and current return terms.
The starting choice here for scanning a finished wall without holes. Its drywall and masonry readings are relative, and the stated sensing depth is up to 3/4 inch. That depth can include material behind a thin surface, so a high reading needs comparison with the same construction. It also supports hardwood and softwood modes. Klein warns against use on or near live electrical circuits; the meter is not insulated.
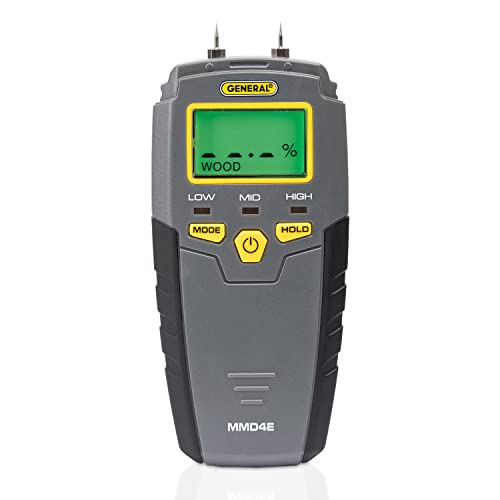
Choose this for accessible wood or supported building materials when small holes are acceptable. It reads at the pin contact and has separate wood and building-material modes. The cap includes a calibration checker; follow the manual when replacing pins. The wood scale is WME (wood moisture equivalent); avoid treating it as a universal drywall percentage. Select MMD4E / Pin Type on Amazon: the listing also groups other meter designs.
An alternative to the ET140 if you prefer its tricolor bar graph. It offers relative wallboard and masonry readings with a stated maximum depth of 3/4 inch. It covers the same broad scanning job, so there is little reason to buy both. The display style does not establish better accuracy.
Start with the least destructive method that can answer the question. Pinless is the first pass on a finished wall. Pins are a local check when you can reach a supported material and a small puncture is acceptable. A dual-mode meter is optional; it does not remove the need for a dry reference.
Painted drywall or ceiling
Use pinless first
Scan a broad area without holes. Studs, screws, corner bead, pipes, wiring, foil, and patches can change the display, so compare the pattern with matching dry wall.
Exposed framing or lumber
Use pins for a local check
Follow the meter's wood setting, species and temperature guidance, and pin-depth instructions. A wood reading is not a drywall percentage.
Baseboard or trim
Use pins when marks are fine
Probe a specific accessible spot when the exact meter supports the material. Small holes are a tradeoff, not a guarantee of better accuracy.
Subfloor from below
Use pins at consistent depth
Keep material, pin depth, and contact consistent. Confirm that the meter supports the substrate before treating the number as comparable.
Masonry or tile assembly
Use only a supported mode
Pinless can show a relative pattern when the manual supports the assembly. Treat the result as a comparison, not a universal percentage.
Same spot over several days
Repeat either method
Return to the same locations with the same meter, mode, contact, and dry reference. A trend is more useful than the largest single number.
Use the home setup hub to choose the next tool. A meter maps moisture in a material; choose a separate water or air-moisture tool only after the wall question is clear.
Spec table
Surface, marks, depth, and what the number means
Choose by what the surface can accept and what kind of number you need, not by brand. Pinless meters infer a dielectric change under the pad. Pin meters measure resistance between probes. The display scale matters as much as the mechanism. The wallboard and masonry modes discussed here are comparative; wood-calibrated instruments can report a different kind of value. Do not compare numbers from different modes as though they used the same scale.
Decision factor
Pinless meter
Pin meter
Surface
Finished drywall, wallboard, masonry, or wood when the exact model supports it.
Wood or building material supported by the exact pin meter and its manual.
Marks
No probe holes. Keep the sensor pad flat on the surface.
Small holes at the probe points.
Coverage
Broad scan to map a pattern across the surface.
A point reading at the probe location.
Depth
A fixed shallow field. The listed cards here claim about 3/4 inch. That is a pad field, not a wall map.
A pin reading is local to the material sampled by its insertion; it does not measure moisture depth through a whole wall.
Reading type
Often a relative wallboard or masonry scale, or a WME-style wood equivalent. Compare to a same-material dry reference. Not a universal drywall moisture percentage.
A material-specific moisture scale when contact and mode match. Wood %MC only when the species or mode and the manual say so.
Interference
Studs, fasteners, pipes, foil, edges, layers, and an uneven pad seat can jump the signal. Recheck from another direction.
Contact quality, pin depth, surface condition, and the selected material mode. Surface salts or conductors can skew a resistance reading.
First job
Map where the signal changes versus a dry reference.
Confirm one accessible spot when marks are acceptable.
Main limitation
A high reading can reflect the layers or conductive material within the sensing field. It needs context and a repeatable comparison.
Probe holes, limited access, and material calibration constrain the reading. Pins alone do not guarantee a more accurate result.
A dual-mode meter that can scan and probe is optional later. It is not required for a finished-wall first check.
Drywall
Should I use a pin or pinless meter on drywall?
Start pinless when you need a broad, non-marring scan of a finished wall. Use pins when a small puncture is acceptable and the exact meter has a scale for that material. Yes, pinless works when the exact model supports drywall, gypsum, wallboard, building-material, or relative mode—the pad responds to the material volume beneath it, not to a hidden leak label. Framing, fasteners, pipes, wiring, foil, patches, wall thickness, and layered finishes can all change the display.
Use the manual's mode and depth limits. Compare the suspect area with a visibly dry section built the same way. Do not borrow a drywall threshold from a different meter, mode, or wall assembly.
Accuracy
Which is more accurate: pin or pinless?
Neither wins every job. Pins give a local check when the material, species, temperature, pin depth, and mode match the manual. Pinless is better for mapping a finished surface without holes. Accuracy depends on material, contact, depth, and the comparison area; extra display digits cannot fix a poor reference.
Is a pin meter better for wood?
It is a strong choice for exposed wood at a specific spot when the exact meter supports that wood setting. Follow species and temperature corrections and keep pin depth consistent. Use pinless wood mode when the finish cannot be marked.
Leak limits
Can a moisture meter find a leak behind a wall?
A meter can show an unusual pattern, but it cannot prove a leak or locate its source. Use a pinless mode only if the exact model supports it. On tile or layered walls, a reading covers material behind the surface too; it cannot tell you which layer is wet. Metal can affect readings. Compare with a dry area built the same way, if safe. Do not open a tile or wall until you know what is behind it and where utilities run. Get qualified help for active water, swelling, suspected mold, or an uncertain wall assembly.
Can a moisture meter detect mold?
No. Moisture readings do not identify mold or confirm growth behind a wall. If the job requires opening the assembly, assessing structural damage, or testing for mold, stop and arrange qualified help.
No-buy
When should you skip buying a moisture meter?
For one isolated drywall check, borrow a meter with a supported drywall mode before buying. Buy only if you expect to repeat checks. If water is active, construction or utilities are unknown, or opening the assembly could be unsafe, skip the meter and call a qualified plumber or building professional; contact an electrician about a possible live-circuit hazard. Stop for active or entering water, spreading damage, soft or swollen material, a sagging ceiling, suspected mold, or a possible electrical hazard before treating readings as the next step. Never use a meter on or near live electrical circuits; follow its exact manual and arrange qualified help when the next step is unsafe.
Scan steps
Scan, confirm, and document the pattern
Set the right mode.Choose the exact material setting and read its stated depth and electrical warnings.
Make a dry reference.Choose a visibly dry spot with the same known material, wall assembly, layers, and finish. Keep the same meter mode and sensing or pin depth, orientation, and contact; record the spot and reading. If the construction differs or is unknown, the readings are not comparable.
Scan a simple grid.Move in straight horizontal and vertical passes with a flat sensor and similar pressure. Do not chase the peak.
Repeat the pass.Rescan the spot from another direction. A spike that disappears within an inch may follow a screw, stud, edge, patch, or other material change.
Mark the result.Record the room and assembly, date and time, meter, mode, depth, sensor orientation, dry-reference location and reading, suspect spots, visible changes, and room conditions. Mark each location from a fixed edge so you can return to it.
Interpretation aid only. Neither shape proves the moisture source.
False readings and next steps
Rule out the wall before you rule in a leak
A pinless high reading can come from the material stack, not a wet patch. Check for:
metal studs, corner bead, screws, nails, or blocking
pipes, wiring, wire mesh, foil, or other conductive backing
studs, seams, patches, tile, adhesive, dense backing, or a change in wall thickness
edges, corners, an uneven sensor seat, wrong mode, or inconsistent contact
Compare the pattern with a matching dry wall. A straight framing line or screw spacing is a reason to rescan from another direction, not to declare the wall dry or wet. Before drilling or opening, check for studs and utilities with appropriate locating tools. If the construction or utility path remains uncertain, stop and get qualified help.
Document the result
Save a reading you can compare
Record the meter and model, material mode, dry-reference value, exact spot, date and time, and any visible or odor change. Keep the method stable.
Return to the same spots.Use the same meter, mode, contact, and reference area.
Note room changes.Record rain, a running appliance, HVAC changes, cleanup, and new visible damage.
Stop when the question changes.Active water, spreading damage, soft or swollen material, or an electrical concern calls for investigation, not more readings.
Next action
Use the pattern to choose the next move
Keep the context with the number. A repeatable pattern can tell you whether to preserve the surface, confirm an accessible material, or stop and arrange investigation.
Finished wall
Preserve the surface
Use pinless scanning to map a signal while the wall stays intact. Compare with matching dry wall before escalating.
Accessible wood
Confirm the material
Use pins when the exact scale matches the wood and small holes do not matter. Keep depth and mode consistent.
Unknown source
Stop and investigate
Arrange repair or qualified investigation when the pattern persists or damage is visible.
Track drying
Compare the same spots over time
Use the same material, known construction and finish, meter mode, sensing or pin depth, orientation, and contact at every spot. Mark the reference and suspect locations from a fixed edge so you can repeat the readings. A trend at the same location is more useful than one lower number.
Room / spot
Assembly
Setup
Reading
Dry reference
Room, wall, material, layers, and finish
Model, mode, sensing or pin depth, orientation
Location from a fixed edge, reading, date/time
Suspect spot A
Confirm it matches the reference
Repeat the same setup and contact
Location, reading, visible change
Suspect spot B
Confirm it matches the reference
Repeat the same setup and contact
Location, reading, visible change
Also note time since cleanup or source control, rain, HVAC, appliance use, and odor. If the dry reference moves too, the room or method changed. Do not call the material dry from one reading.
Common questions about pin vs pinless moisture meters
Pin vs pinless moisture meter: which should I buy?
Start pinless when you need a broad, non-marring scan of a finished wall—the Klein ET140 is the clearest starting option here. Use pins when a small puncture is acceptable and the exact meter has a scale for that material—the General Tools MMD4E suits accessible point checks. Compare the suspect area with a same-material dry reference either way.
Should I use a pin or pinless meter on drywall?
Start pinless when you need a broad, non-marring scan of a finished wall. Use pins when a small puncture is acceptable and the exact meter has a scale for that material. Compare the suspect area with a same-material dry reference either way.
Which is more accurate: pin or pinless?
Neither is always more accurate. Pins give a local check when the material and mode match; pinless is better for a broad finished-surface scan. Contact, material, depth, and comparison method matter more than extra display digits.
Can a moisture meter find a leak behind a wall?
A meter can show an unusual pattern, but it cannot prove a leak or locate its source. Use a pinless mode only if the exact model supports it. On tile or layered walls, a reading covers material behind the surface too; it cannot tell you which layer is wet. Metal can affect readings. Compare with a dry area built the same way, if safe. Do not open a tile or wall until you know what is behind it and where utilities run. Get qualified help for active water, swelling, suspected mold, or an uncertain wall assembly.